How To Convert Videos To Image Sequences
Natron works best when using image sequences as input.
Video can be used (mp4, mov etc) as input but may face stability issues.
Converting the video to a sequence of images is recommended.
There are a number of solutions for converting the video to frames:
FFmpeg
FFmpeg provides a convenient command-line solution for converting video to images.
Open a terminal and navigate to the folder containing the video.
Use this command to extract the video to a png image sequence:
ffmpeg -i input.mp4 -pix_fmt rgba output_%04d.png
Replace input.mp4 with the name of your video and output_ with the name your output image files.
%04d specifies the position of the characters representing a sequential number in each file name matched by the pattern. Using the above example the output files will be called output_0001.png, output_0002.png, output_0002.png and so on. For longer videos you will need to use a higher number (%08d.png).
Here are some more options:
PNG (with Alpha)
for 8 bit
ffmpeg -i input.mp4 -pix_fmt rgba output_%04d.png
for 16 bit
ffmpeg -i input.mp4 -pix_fmt rgba64be output_%04d.png
PNG (without Alpha)
for 8 bit
ffmpeg -i input.mp4 -pix_fmt rgb24 output_%04d.png
for 16 bit
ffmpeg -i input.mp4 -pix_fmt rgb48be output_%04d.png
To extract TIFF 16 bit image sequence:
TIFF (with Alpha)
for 8 bit
ffmpeg -i input.mp4 -compression_algo lzw -pix_fmt rgba output_%04d.tiff
for 16 bit
ffmpeg -i input.mp4 -compression_algo lzw -pix_fmt rgba64le output_%04d.tiff
TIFF (without Alpha)
for 8 bit
ffmpeg -i input.mp4 -compression_algo lzw -pix_fmt rgb24 output_%04d.tiff
for 16 bit
ffmpeg -i input.mp4 -compression_algo lzw -pix_fmt rgb48le output_%04d.tiff
Note
“-compression_algo packbits or raw or lzw or deflate” - is optional. Using it for 4k/+ is recommended. For 4k/+ deflate can be used. For HD lzw can be used to lower the file size.
Note
“-pix_fmt rgb24 or rgba” is a must to include convert the color space. YUV/YCRB is not ideal for many en/decoders for TIFF.
Although if YUV colorspace is necesary to intact it is possible to do the closest RGB conversion using -sws_flags. It will intact the chroma in full.
Example:
ffmpeg -i "input.MXF" -compression_level 10 -pred mixed -pix_fmt rgb24 -sws_flags +accurate_rnd+full_chroma_int output_test%03d.png
ffmpeg -i "input.MXF" -compression_algo lzw -pix_fmt rgb24 -sws_flags +accurate_rnd+full_chroma_int output_test%03d.tiff
For more information on support pix format and compression for TIFF in ffmpeg in the terminal type: ffmpeg -v error -h encoder=tiff
More information of FFmpeg’s command line options https://ffmpeg.org/ffmpeg-formats.html
Kdenlive/Shotcut
https://kdenlive.org/ https://shotcut.org/
With the video(s) on the timeline go to Project > Render. In the render settings choose Images sequence and select the desired image format.
The sequence will be output with the specified file name and format and using five digits for its numbered sequence (e.g. output_00001.png).
Full instructions on how to use Kdenlive can be found here https://userbase.kde.org/Kdenlive/Manual/Project_Menu/Render
Blender
Import the movie file in Blender Video Sequencer.
Go to render properties.
In Color management change view transform standard.
Go to output properties.
Select File format PNG/TIFF.
Select RGB/RGBA, 8/16 Color depth, and preferred compression NONE/Any.
Full instructions on how to use the Blender VSE can be found here https://docs.blender.org/manual/en/latest/video_editing/index.html
Adobe Media Encoder
Open Media Encoder.
Add source video to the queue.
Set the output format to OpenEXR.
Set compression to “Zip”.
If the source has an alpha channel be sure to scroll down to the bottom of the Video section of the Export Settings and check “Include Alpha Channel”.
Close the Export Settings by clicking Ok and press the Start Queue button.
DaVinci Resolve
In Resolve, select your videoclip.
Go to File => Media Management.
Select Clips.
Select Media Destination.
Select Video format => TIFF or EXR.
Click Start.
How To Convert Image Sequences To Video Files
FFmpeg
Converting your images to video follows a similar process to doing the reverse.
Open a terminal and navigate to the location containing the images. In the terminal type:
ffmpeg -i input_%05d.png output.mp4
Change input_ to match the name of the files. The number of characters in the sequence (%05d) should match the amount in your input files. For example, if the files have four characters in their sequence (e.g. input_0001.png) then it should use %04d.
For this to work correctly all of the files need to be sequentially numbered and the sequence should start from either 0 or 1.
It is can also specify the framerate and the codec, here is an example for framerate 30fps:
ffmpeg -framerate 30 -i input%04d.png -c:v libx264 -r 30 -pix_fmt yuv420p out.mp4
Using NLE
Kdenlive, Shotcut, Da Vinci Resolve, Adobe Premiere
Import the image “as sequence” in the timeline (or drag’n’drop the folder) and render in your preferred video format.
Creating Digital Intermediate For Editing Servers
For Digital Intermediate, the PRORES 4444 codec is a nice choice for MOV containers. It supports 12-bit with YUVA and retains alpha with 16-bit precision.
It can be done with ffmpeg or in kdenlive/Shotcut importing the TIFF/PNG as sequence.
FFmpeg
ffmpeg -framerate 30 -i input%03d.tiff -f mov -acodec pcm_s16le -vcodec prores_ks -vprofile 4444 -vendor ap10 -pix_fmt yuva444p10le out.mov
Shotcut/Kdenlive
A render profile needs to be created first with below profile:
f=mov acodec=pcm_s16le vcodec=prores_ks vprofile=4444 vendor=ap10 pix_fmt=yuva444p10le qscale=%qualityUse TIFF/PNG image as sequence in the timeline.
Then Render with this newly created prores 4444 profile.
A tutorial on PRORES in LINUX by CGVIRUS: https://youtu.be/oBiaBYthZSo
It can be done with Adobe Premiere/Avid/Fcpx/Resolve etc as well by importing TIFF/PNG as sequence and render as MOV prores 4444.
DaVinci Resolve, Adobe Premiere etc
Drag and drop the folder containing the image sequence to a timeline.
Render the timeline in PRORES 4444.
How to Render Image Sequences from Natron
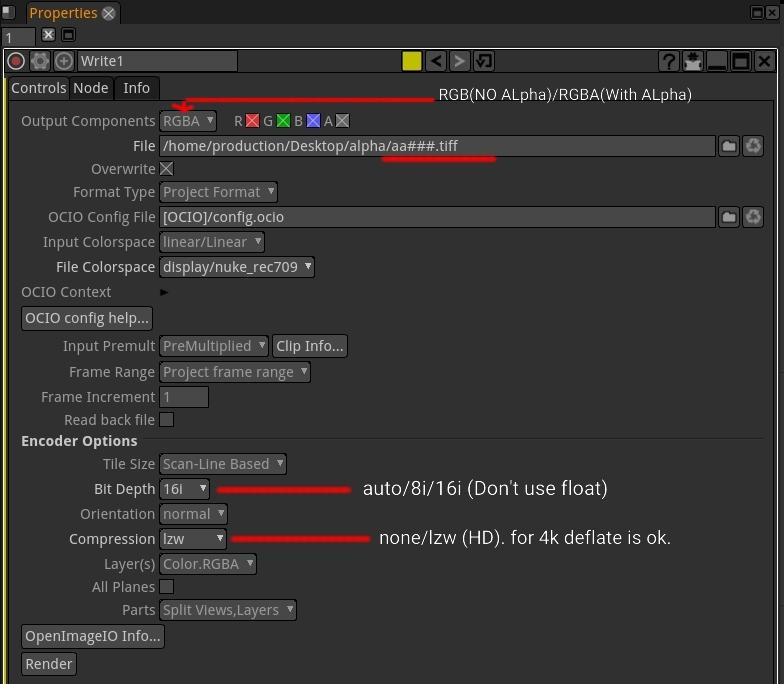
The preferred file format to render out composited frames is TIFF.(image attached):
In the write node:
output components can be RGB(no transparency) or RGBA(with transparency)
Use filename_###.tiff (where # is the frame number and padding) ### will create yourfilename001.tiff and ## will create yourfilename01.tiff
Bit depth can be auto/8i/16i (Don’t use float)
compression can be none/lzw (HD). for 4k deflate is ok.
Use filename_###.tiff (where # is the frame number and padding)
### will create yourfilename001.tiff and ## will create yourfilename01.tiff
Bit depth can be auto/8i/16i (Don’t use float)
compression can be none/lzw (HD). for 4k deflate is ok.
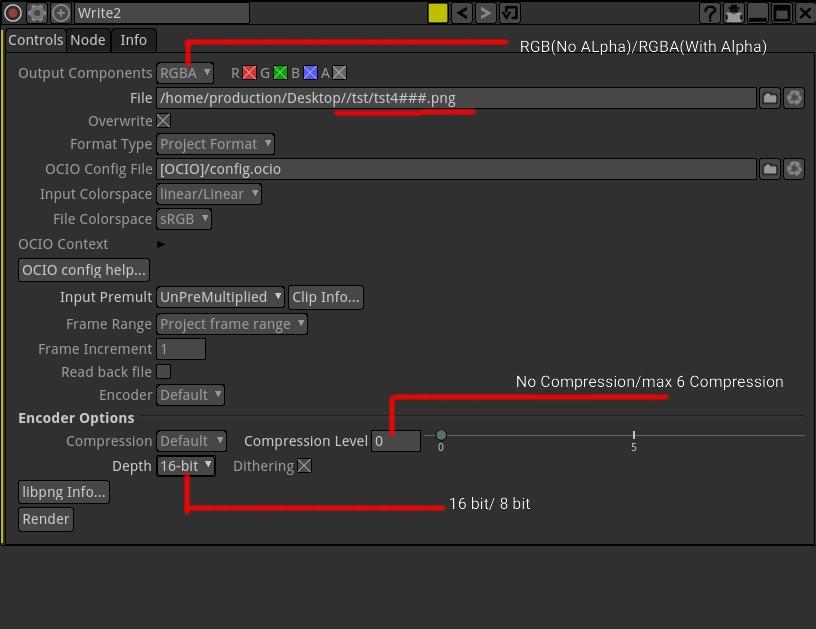
PNG is also a good format:
In the write node:
output components can be RGB(no transparency) or RGBA(with transparency)
Use filename###.png (where # is the frame number and padding)
### will create yourfilename001.png and ## will create yourfilename01.png
Bit depth can be 8/16bit
compression can be 0 for HD, 6 for 4k is fair enough.
Open Questions for this document:
What format should I use for frames? (esp if the video is 10bit or 12bit) ?
Suggestion: For muxing audio. But it is usually pointless as it goes to NLE at the end.