Properties panels
Here you can interact with the node properties to fine tune the effect on the image. As in the rest of Natron all changes are non destructive and can be modified at any time.
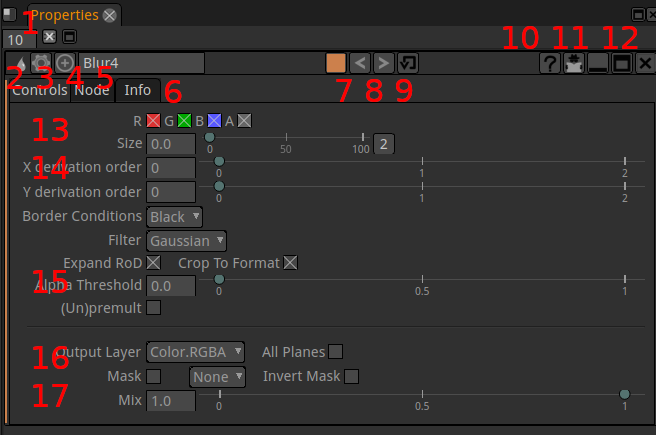
- The elements of the properties panel are:
1 Maximum number nodes opened in the properties window
2 icon of the node to identify it’s type. Most useful when the name has been changed. Hovering the icon popups the node type in plain text
3 icon of the presets / user menu Presets menu
4 icon of the center in node graph. When you click this the view in the node graph is moved to center the node on screen
5 Node name This can be changed but it is good to keep this name to easily tell the type of a node and keep syntax short, should you reference this node in an expression. For more verbosity the node “label” field gives more freedom.
6 Node parameter tabs. The parameters of a node are spread across several tabs. The controls, Node, Info tabs are present in most nodes but others can sometimes be found too. You can even add tabs through
7 The color of the node in the graph window
8 Undo/redo specific for this node and not the overall Natron session.
9 restore values for this operator. When clicked it will reset the node (including those with expressions)
10 the ? icon opens the documentation for the specific node
11 shrink the node pane to show only animated parameters. Use only after you started your animations.
12 flat line: shrink completely the node parameters display. Box icon: detach the node of the current pane
13 Global parameters :ref: proppanel_parameters
14 Main parameters
15 Optimisation parameters
16 Limitation parameters
_proppanel_parameters: Controls tab ————–
- RGBA
The channels that will be computed
- Main parameters
These ones are different for each node type as they are the ones really defining the effect.
- Border Conditions
Sets the way to evaluate pixels beyond the canvas edges “Nearest” virtually extends the image to avoid the appearance of dark edges when blurring and set to “Black”
- Expand RoD
Let the calculation of the node run for “out of image” pixels. These pixels could be brought back in frame by a subsequent transform lower in the graph
- Crop to Format
crop the result to the format defined in pro ject settings avoiding useless calculations
- Output Layer
Define the channels that will actually be modified by the node
- Mask
Define how the mask provided on the mask input should be treated. By default the node affects the image only where the alpha channel of the mask input is not Black
- Mix
Let’s you revert partially the effect to go back toward the original image
Node tab
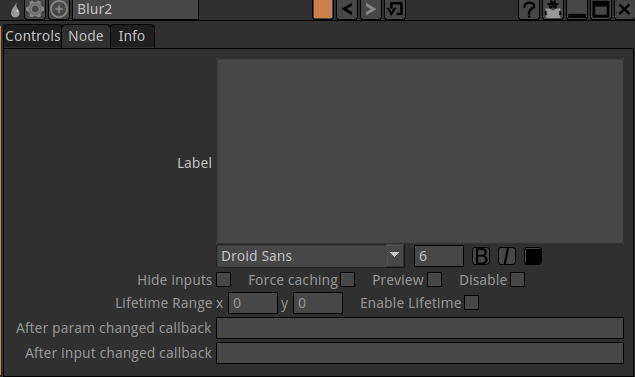
- label
Here you can put custom test or expressions that will be shown in the node graph on the “body” of the node.
- Hide inputs
Hide the incoming connexion arrow of the node. Useful when it is very far from it’s inputs
- Force caching
Avoid rerendering this node (and ustream ones) when your are done setting up this part and will start to add more nodes downstream.
- Preview
Add a “postage stamp” to the node to get a preview of the image getting out of it.
- Disable
Same as toggle with “D” key to compare with and without the effect of the node
- Lifetime
Save computation time by not evaluating this node outside of the Lifetime interval. This is similar to the in/out points of a clip in editing
- Callbacks
are for python scripting and automation of Natron
Info tab
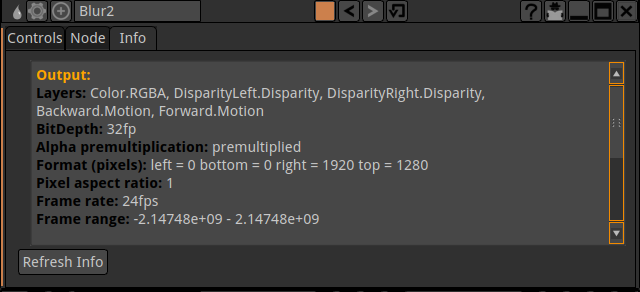
Here you can check the properties of the data generated by the node. It may be useful if your project becomes suddenly very slow to compute. For example, memory can be filled by an image carrying too many Layers that may not be useful
User tab(s)
To build expressions you can add new parameters to your node. They can’t be added to default tabs. You will be prompted to add a user tab before adding new parameters to it with command “Manage user parameters… ” Presets menu
Presets menu
This menu let’s you work on the parameters of the node
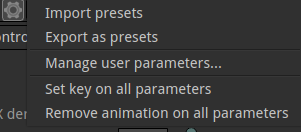
- Import Export presets
Let you save to file the values of all the parameters of the node at once. This can then be restored with “Import”
- Manage user parameters…
A menu to add new parameters to your node. They will be useful to build expressions that can be modified interactively (on “real” parameters)
- Set key on all parameters
A quick and dirty way to animate the values of a node
- Remove animation on all parameters
A quick way to “freeze” a node settings. Only animation curves will be frozen. Expressions are kept.